Create a job
By the end of this tutorial you will have a job in Planner with its first staffing need in place, ready to schedule people against. Set aside about ten minutes. You need the Plan rotations permission to create a job.
Before you start
A job points at things that must already exist: a facility, a customer, and a job type. If you also set up staffing straight away, you will need a role too. You can create any of these on the fly from the job form using the create option in each picker, but it is cleaner to set them up first.
If you are not sure how jobs and demands relate, read How jobs, demands, and crew changes work first.
Step 1: Open the create form
From Jobs, choose to create a new job. The form has two parts: the job itself, and an optional first staffing need.
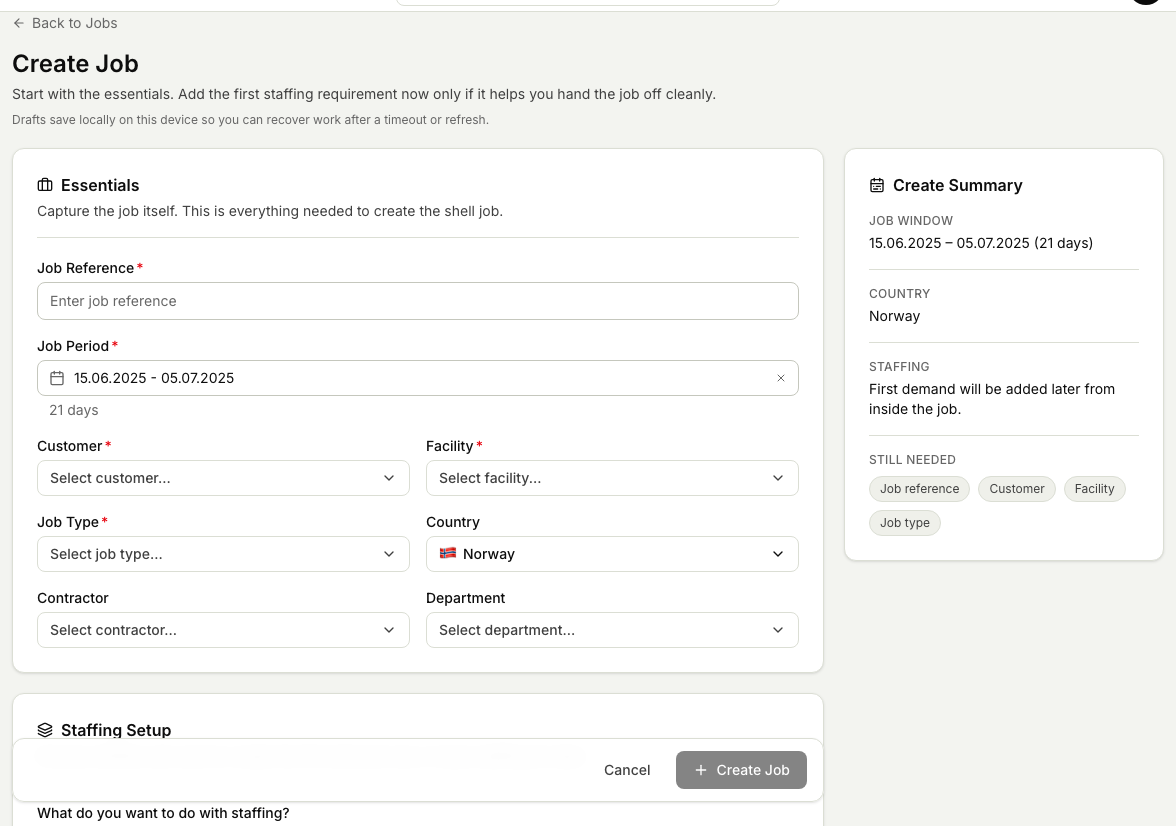
Step 2: Fill in the essentials
Complete the required fields:
- Job reference. Your own name or number for the job.
- Job period. The full start and end dates. The form shows the length in days as you pick.
- Customer. Who the work is for.
- Facility. Where the work happens.
- Job type. What kind of work it is.
Country defaults to a sensible value and is optional, as are contractor and department.
Step 3: Add operational detail (optional)
Open Advanced details if you want to record notes for whoever picks up the job next:
- A free-text description.
- Mob and demob locations, where personnel join and leave the work.
- A daily start and end time for the crew.
You can skip all of this and add it later.
Step 4: Choose what to do about staffing
Under Staffing setup, decide how much of the staffing you want to set up now:
- Add later. Create the job shell only. You add demands afterwards, which is the usual choice when the detail is not settled yet.
- Auto-assign. Create a first demand that lets Planner work out roles from your configured mappings, rather than you naming a role.
- Set up demand. Create a first demand yourself now, choosing the role and headcount.
If you pick Set up demand, fill in:
- Activity type, which sets the field-work pattern and its shifts.
- Demand dates, which follow the job period until you change them and must stay inside the job.
- Role to fill first, the job role this demand asks for.
- Shift headcounts, how many people each shift needs. If the activity type has no shifts, the demand is still valid and simply has no per-shift numbers.
Step 5: Create the job
The summary panel tells you when the job is ready and lists anything still missing. When it is ready, create the job. Planner opens the new job so you can carry on adding staffing or people.
Next steps
- Add more staffing needs with Add a staffing need to a job.
- Move to the schedule board to fill those needs. See How rotations, demands, and assignments fit together.