Send qualifications and documents for approval
You can send qualifications and documents from your own Workspace instead of using email or asking someone to register them for you. One Send documentation button lets you first choose what you are sending and then shows only the details needed for that kind of request. What you send goes to HR for review before it becomes part of your People record.
Self-service submissions must be turned on for your organisation. If you do not see Qualifications & documents or Send documentation, ask your Markular administrator.
If you are being onboarded, an administrator can also enter your existing records for you.
New to Markular? Enter the certificates and documents you already hold the same way. Set each one's real issue and validity dates so your record is accurate from day one.
What you can submit
- A competency, such as a course, certificate, or qualification you have gained. You give its details, for example a certificate number, a level, and the dates it is valid, and attach proof.
- A travel or identity document, specifically a passport, seaman's book, or visa. You give its details, for example the number and the issue and expiry dates, and attach a scan.
- A personnel document for HR, such as a completed form, certificate or other document HR has asked you to provide. You give it a clear name and attach the file; HR chooses the correct internal category during review.
Start a request
- Open Workspace → Qualifications & documents.
- Choose Send documentation.
- Choose Course or certificate, Travel or identity document, or Other personnel document.
- Complete the focused form and send it to HR.
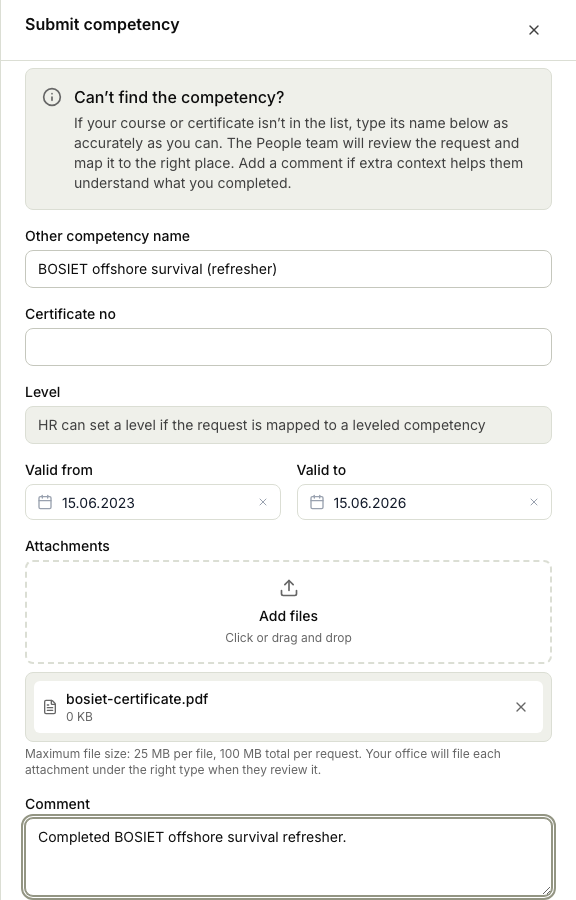
Submit a competency
- Choose Send documentation → Course or certificate.
- Pick the competency from the list, or enter a name if it is not there.
- Fill in the details: the certificate number, the level, and the dates it is valid from and to.
- Attach any supporting files, such as a scan of the certificate.
- Add a comment if there is anything the reviewer should know, then submit.
If the competency is configured to require documentation, include the supporting file. After approval, Planner does not treat that competency as fully compliant until its attachment is present.
Submit a document
- Choose Send documentation → Travel or identity document, and pick which kind it is: a passport, a seaman's book, or a visa.
- Fill in its details: the number, the issue and expiry dates, where it was issued, and for a visa the type and country.
- Attach a scan of the document.
- Add a comment if needed, then submit.
Send a personnel document to HR
If HR requested a document through an employee journey, open the task in Workspace → My Tasks. Markular shows the requested document and instructions on your profile. Add the file and choose Send to HR; you do not need to enter the document name again. The task remains open while HR reviews the document and is completed when HR approves it.
For a document that is not part of a journey:
- Open Workspace → Qualifications & documents.
- Choose Send documentation → Other personnel document.
- Enter a clear document name, attach one file and add a short note if useful.
- Send it to HR.
The document is not part of your personnel record while it is waiting. Your request appears together with your other requests, where you can see whether it is pending review, needs changes, was not approved or has been added to your personnel record.
Track your submissions
Your submissions are listed together so you can see where each one is, with its status. Open one to see its history and any comment the reviewer left. You can filter the list by type or by status.
While a request is waiting for review, or has been returned for changes or documentation, you can update its attachments. When you cancel a request, or a reviewer approves or rejects it, the request and its original attachments become read-only.
When a request is approved, Markular creates a separate approved copy on your People record. You can view that copy, but it is administered as an HR record by the responsible reviewer or HR team. If something needs to change later, submit a new request instead of changing the approved copy. Rejected and cancelled requests do not add anything to your official record; their original files remain in the request history according to your organisation's retention policy.
What the statuses mean
- Pending: submitted and waiting for a reviewer.
- Approved: accepted. An approved, read-only copy of the competency or document is now on your record.
- Changes requested: the reviewer needs something changed before they can approve it. Update it and send it back.
- Awaiting documentation: the reviewer needs supporting files before they can decide. Add the files they asked for.
- Rejected: not accepted. The reviewer's comment explains why.
- Cancelled: you withdrew it.
Respond to a reviewer
- If your submission is Changes requested, open it, make the changes the reviewer asked for, and resubmit it.
- If it is Awaiting documentation, attach the files the reviewer asked for so they can continue.
Cancel a submission
If you submitted something by mistake or no longer need it reviewed, you can cancel it while it is still waiting, and add a reason if you want.